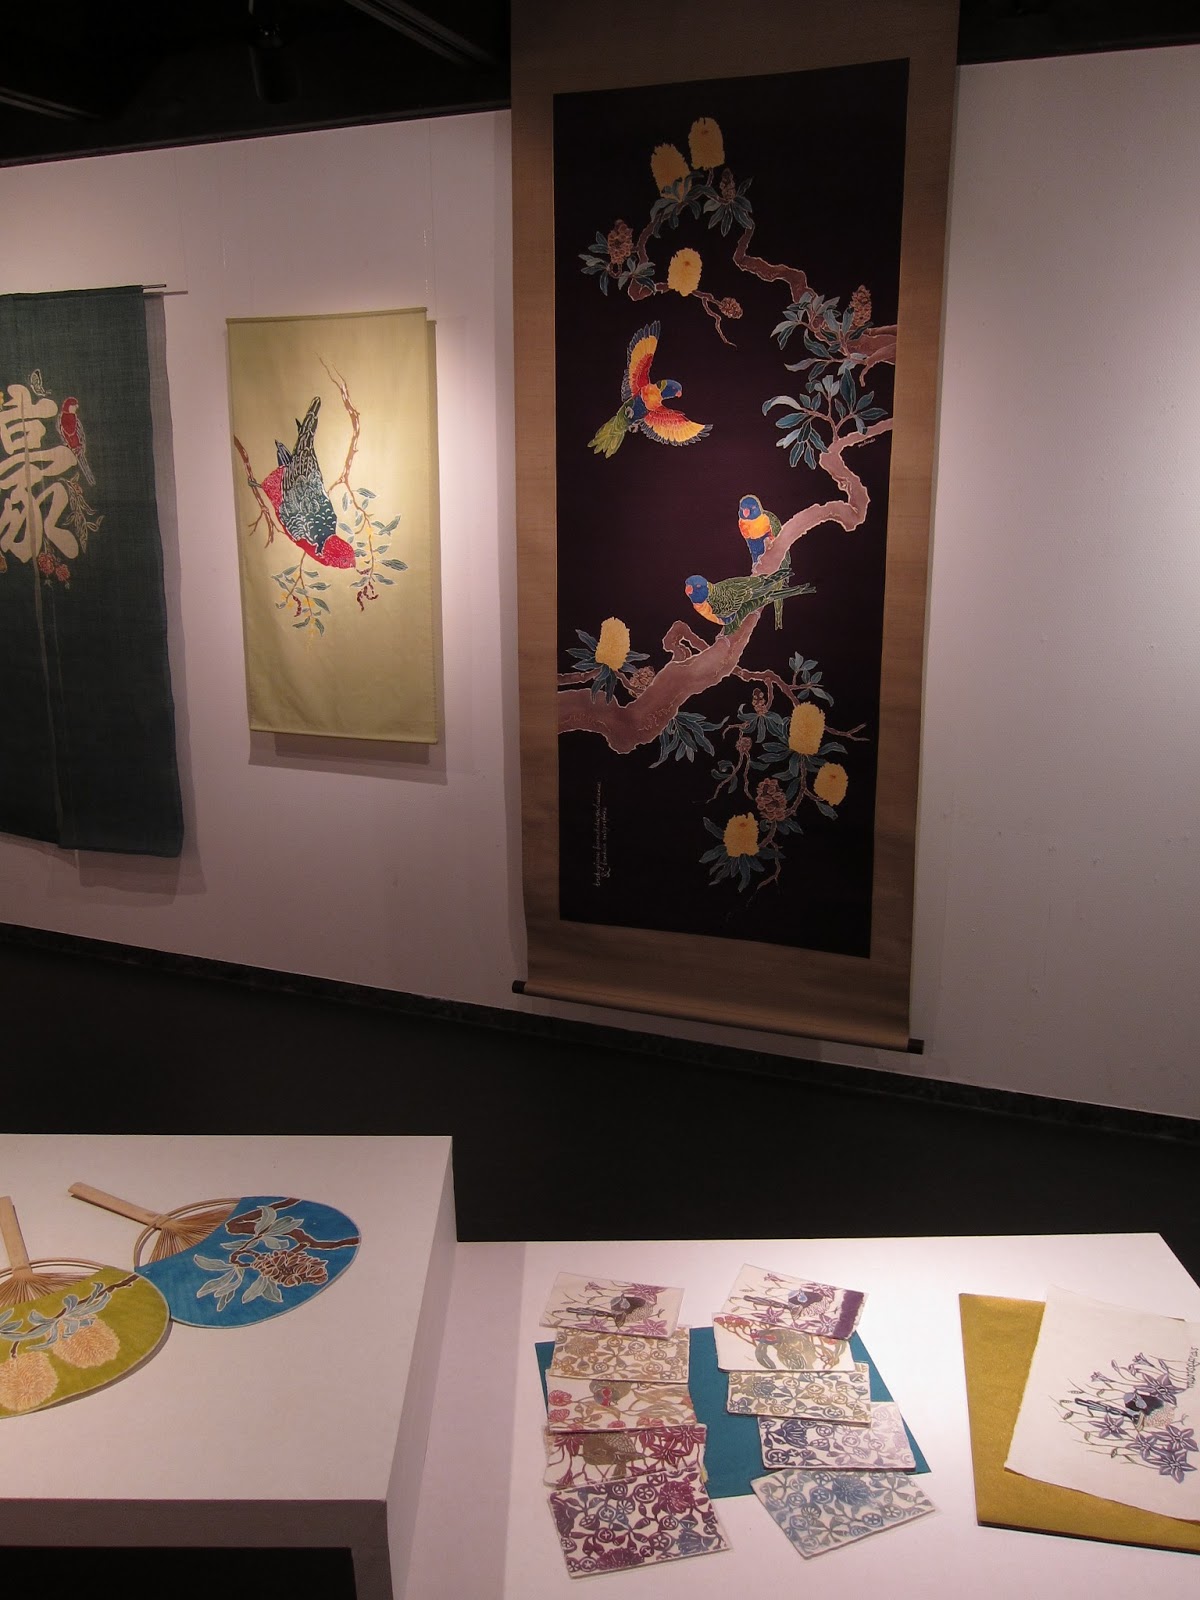
It's been a week or so since my first solo
exhibition wrapped up at h2o Gallery in Kyoto. What an incredible two weeks it was! I
spent most of the time at the gallery, talking with visitors, explaining my
work and just generally speaking a lot of Japanese!
The entrance to Gallery h2o leads onto a
long corridor. The gallery's trademark is to hang a differentnoren curtain each time
they are holding an exhibition. This was the first time they'd had an artist
who dyed their ownnoren!
All the works were completed in the last 2 years whilst a Research Student
全部の作品はこの二年間(研究生だった間)に作ったものです。
I also had washi postcards and fans out for sale. I sold the majority of them!
染めたハガキや団扇も販売していました。結構売りました!
The Japanese-style room off to one side was perfect for this scroll piece and the Lorikeet Lacquerware platter that I've shown you before. 茶室の床の間に作品がぴったり入りました。掛軸のような作品と前に紹介した漆器。
Lots of people actually showed up for the opening that was organised very last minute, yay! オープニングに沢山の友達や学生が来てくれてうれしかった!
Look who else came along! My Dad happened to be in Japan on a bicycle touring adventure of sorts and was in Kyoto just in time for the opening. It was so nice to have him there. それでこの人も!父です。ちょうど自転車の旅行で日本に来ていて、京都に居るにあわせてオープニングパーティーをしました。父さんが来れてなんて嬉しかったです。
This is a little teaser! crew from MBS (Mainichi Broadcasting) came to film me and my exhibition. More details soon!!
これはティーザーです。MBSの人が展覧会の様子を取材に来て、インタビューもしたんです。近いうちに詳しいことをアップするので、楽しみにしてください!
The experience of talking to all different kinds of people about my work was very rewarding. I took away all sorts of interesting comments and ideas and I feel like my work was very well received. I think most people grasped what I was trying to achieve which is very encouraging. It gives me the enthusiasm to regroup and start making new work all over again!
I promised progress photos of my kimono dyeing and after several weeks of 12-hour long (or more!) days spent dy(e)ing, so here they come!
着物の色差しの写真をアップすると約束したのでここに載せます!数週間の間、一日に12時間以上作業する日が多かったけど、辛くても模様が生きてくるのが愉しみだった。
This step is called iro-sashi (色差し) which means putting on colour. In the case of yuzen technique, this means working withing the fine resist lines with various brushed and filling in the shapes with dyes. It's not unlike the silk painting that we are familiar with in Australia. In the case of yuzen, the dyes are mixed with a little thickener (sodium alginate: smells like a scummy rockpool but it does the trick), to prevent them from bleeding under the resist.
今回の写真は「色差し」の段階に撮りました。友禅の場合、色差しというのが、糊で置いた細い線の中に染料を筆や刷毛で差すのことです。にじまないように、メイプロガムという糊で染料にとろみを付けます。(腐った潮だまりの匂いがするけど、効果的です)
There are many dyeing techniques for yuzen, to achieve gradations, depth of colour and various effects.This video is classic 1990's Japan but it really gives a great idea of how a professional yuzen dyer goes about his work. You can see he uses both flat and round brushes, sometimes works wet on wet and is only working on a small section of the kimono fabric which is stretched taut on shinshi bamboo stretchers. My dyeing skills are nowhere near as skilled as his but anyway, here's some pictures of what I managed!
友禅には色んな染め方があります。このビデオがちょっと古い感じですが、色差しの説明としてとてもいいと思います。見えるように、この職人さんが色彩筆も刷毛も使っているし、塗れている染料にまた濃い色を加えているし、着物生地の部分だけを染めるために伸子で張ってありますね。それでは、職人さんのレベルに比べられないけど、自分で染めたのはこんなものです!
mixing dyes 色を準備して置く
dyeing flowers 花びらを色差し
職人さんがよく刷り込み刷毛も使いますが、私は筆の方が染めやすいと思います。Yuzen professionals often use flat tipped brushes but I prefer these round brushes.
ユーカリの実と葉っぱ。dyeing eucalyptus leaves and buds
testing colours on the actual silk fabric of the kimono. 着物に使う生地に色の試し
and then! hanging the almost complete lengths up together. So satisfying to join up all the pieces!!! This is the centre back and part of the back right sleeve. それで、大体染めた四枚を棒で吊って、柄合わせして見る。これは背中と右袖の裏です。
a detail from one of the sleeves 袖の部分
まだ出来てないが、適当に吊って、どういう感じかを見るだけ。裾にある白い部分が水側。それはまだ染めていない部分です。Its not really a kimono yet, just four lengths of fabric. I hung them up and pinned the pieces in place to get an idea of the final result. Yipee!! the white section on the hem is a water motif, yet to be dyed in this image.
The next step (there always seems to be another one!!) is to take the fabric to a company in Kyoto to have a final steaming and the rubber resist paste removed. They will also do what's called ゆのし yunoshi where the fabric is held taut over steam to make it nice and straight again. Then I will have a unique hand dyed bolt of fabric that gets handed on to a seamstress (who knows what they are doing), to sew it all into a kimono for display! What an epic process this has been! (still is!!)
次の段階は(いつももう一つの段階があると感じる!)染色整理会社に渡して、最後の蒸しをして、ゴム糊を取って、湯のしまでやって貰います。その後は綺麗な(かな!?)友禅染の一反を誰か上手な人に展示用の着物に縫ってもらいます。たしかに長編冒険談のように、このプロセスが終わらない!!
The plan is to have the kimono all ready to go for my solo exhibition coming up at the start of April in Kyoto. Lots to get done before then!! I'll be putting up details of the exhibition here before long.
一応四月上旬の個展で出来上がった着物を展示する予定です。古典まで色々頑張らないといけないです!また個展の詳しい情報をここに載せます!
Since I last posted pictures in my post Making a Kimono..., I have gone through several important stages of the process: nori-oki (applying resist paste), ji-ire (applying pre-dye sizing), fuse-nori (covering paste) and ji-zome (background dyeing). Here I'll try and briefly explain these steps.
*Nori-oki 乗り置き
literally means the putting on of paste. In all my previous work, I have used the traditional form of nori that is a combination of mochiko rice flour and komon-nuka rice bran. Traditional nori is soluable in water and dries to a stiff resist. In humid summer months, the dried nori remains leathery but in winter it's water content to dry up and it ends up cracked like an egg shell (not good!). Being winter this time, and for it's water resistance (essential to the background dyeing part of the process) I used gomu-nori, a rubber paste that has a blue colour added to it for visibility. It is much more sticky and viscous than standard nori and smells like paint (unfortunate) but on the plus side, it is nice and flexible when it's dry and it doesn't wash out in water which means it can be used in clever combination underneath standard nori to achieve layers of dye.
青花で描いた線に沿ってゴム糊を置いていきます。この場合、渋紙で作られた筒ではばく、セロファンで作った筒を使います。
applying rubber paste along the lines traced with aobana (water soluble ink) onto the fabric previously. in the case of rubber nori, you can use a cellophane cone (much like cake decorating), and throw it out once empty and start on a new one. Wasteful but better than getting this sticky rubber all over your fingers and nice metal tipped paper cone.
糊を置くと、ただ青花に沿っていくということじゃなくて、よりいい作品を作るために改めて見て、あちこちにちょっと変更することがいいと言われています。
They say that when applying the resist paste, you ought to be improving upon your design as you go. That is, rather than following the traced lines passively, see the design afresh and make any changes you see fit.
Ji-ire is the term for pre-sizing the fabric before dyeing. Japanese textiles traditionally use milk extracted from soybeans and a thickener in the form of funori-seaweed. This application of sizing helps the dye 'grip' the fabric evenly and prevents dyed edges from bleeding. The ji-ire liquid is applied to the back side of the entire length of fabric quickly and in one go, keeping the brush moving and working down the fabric to ensure an even application. I made a 2 minute video of this process when I was about 70% of the way down one of my lengths of fabric. My wrist was starting to get sore by this point! You can see it is tricky to work around the bamboo shinshi that are keeping the fabric stretched taut.
*Fuse-nori 伏せ糊
Having applied my design areas using the rubber resist, I now want to be able to dye the background colour. To do this, I need to mask all those precious birds and plants so they remain white, to be dyed later. This is where the rubber resist proves it's worth. I go back and apply a masking layer of normal resist paste over my design areas, this time using the normal paper cone with a metal tip. To help this resist dye, you sprinkle a layer of fine sawdust on top of the wet paste. When it's dry, it feels a little like sandpaper.
渋紙の筒で普通の糊をゴム糊の上に置きます。地染めの色に染めたくない部分を守るというわけです。 protecting the parts of the design I don't want to dye yet by applying normal resist paste on top of the rubber resist.
先がねを外したら、広いところを早く伏せられます。taking the metal tip off to cover larger areas more quickly.
乾いていない糊にひき粉を撒きます。sprinkling fine sawdust over the wet paste will give it strength.
Finally the nerve racking step of dyeing the base fabric colour. This makes you sweat for two reasons. 1. You'll be physically sweating by the end because you need to dye all 17 metres in one go so that your colour application is even and the fabric all dries in the same temperature conditions etc. 2. You will sweat it out mentally because you're hoping that your fuse-nori is doing it's job resisting the dye and that you aren't leaving any (too many) irregular areas in your dyeing.
The dye is applied in the same way as the sizing, but with a more (expensive!) absorbent brush made from deer hair. You need to be applying just enough dye so that you're not dry-brushing the fabric but certainly not flooding it either.
紫!今回も酸性染料で染めました。紫専用の刷毛ですね。mmm, purple! using the 'purple-only' brush, made from deer hair. This is acid dyestuff.
染めた時は焦っていたので糊が置いた状態の写真が取りませんでした!この写真では普通の糊が洗い取った状態で、ゴム糊の線と白い模様の部分が残っています。よっしゃ!I was busy in the moment of dyeing, so I don't have a picture of the dyed lengths with the paste still attached. Here, you see the fabric after the normal paste has been washed off and the rubber resist lines remain, along with my white design areas. yay!
紫の地染めした後の生地です!これで次の段階(色さし)の準備ができました。(実はこれを撮ったときはもう少しだけ色さしを始まりましたけどね)detail of the fabric with the background dyed, ready for the next stage: dyeing the patterned areas! (actually I had already started here, just a little bit on the grass seed pods )
In the textiles department at Kyoto Seika, students often make kimono. My teachers had been suggesting I dye my own kimono since July. I was scared!...the fabric is expensive, it takes a really long time to complete...but it's another of those 'only-in-Japan' opportunities, so for better or worse I am in the midst of producing a kimono!
京都精華でテキスタイルの学生は良く着物を作ります。7月以来教授たちは「着物を作ろう」と言っていましたけれども、怖かった!着物用の生地が高くて、制作は何月間が掛かるしと思ったが、やはり日本だけで掴まえる切っ掛けなので今自分の着物を作っています!
some initial sketch ideas 色々考えた
Creating a design for a dress is one thing, designing for a kimono is an entirely different beast. Parts of the kimono are folded upon wearing and are unseen except when displayed. When worn the front left overlaps the front right so that disappears too. The patterns and colours of a kimono vary depending on the age of the wearer and the occasion; older women wear smaller patterns and more delicate colours, young women can wear very bright and large motif designs. Some kimono are patterned all over, others only on the hem or on certain sections only. All of these things and more took a long time to get my head around but finally I came up with a design for a furisode - an unmarried woman's kimono with longer sleeves.
ワンピースなどの服のためのデザインを作るとは全然違います。例えば、着たら、長さを調節するためにあまった生地を折って重ねますし、着物の左側が上に巻きますので右側の模様を隠してしまいますし。後、年齢や行事によると、着物の柄や色が違います。こうゆうことを色々考えた上、やっと振袖のデザインを作り上げました。
This time I wanted to work with more flying birds, because they really lend an energy to the image. In my research of what birds are attractive in the air, I decided on the Rainbow Bee-Eater (merops ornatus). These tiny birds have spectacular green, blue and yellow feathers and spend most of their time in the air chasing their main food source of bees and insects. They are migratory birds that spend their winters in the north of Australia and New Guinea and then return to breed in Australia in summer.
今回のデザインでは、飛んでいる鳥をもっと入りたかったです。飛んでいる鳥は作品にはエネルギーを与えると思います。飛んでいる姿が綺麗な「Rainbow Bee Eater」(ハチクイ属)を染めることにしました。この鳥はハチや蛾を食べるので、いつもひらひらと飛び回っています。冬はオーストラリアの北部やニューギニアで過ごすけれども、繁殖期は夏で暖かい南オーストラリアに帰ってきます。
sketches
getting a rough idea of how the kimono would look displayed
building up the design with eucalyptus
Right now I'm tracing my design onto the silk fabric I bought using a blue ink called aobana. This is water-soluble and will come off the fabric at a later stage. The next steps will be to apply the resist paste using a reinforced paper cone with a metal tip and then commence brush dyeing using acid dyes.
今は「青花」という液体で、買った絹にデザインを写しています。次の段階は糊を置いて、酸性染料で染めるのを始めます。
tracing my design onto the fabric using aobana. You can see the silk I chose has a wave self-pattern running through it.
青花でデザインを絹に写します。生地は波の模様が入っています。
the hem of the kimono all traced on, satisfying! 裾に全部写した後。
So I'm afraid this is another cliff hanger. I will post more pictures as the Kimono really gets underway. Wish me luck!! 着物の作業が進んだらまた写真をアップロードしますので、楽しみに待ってください!